Author Archives: admin

Single Page Application – Sketches to wireframe

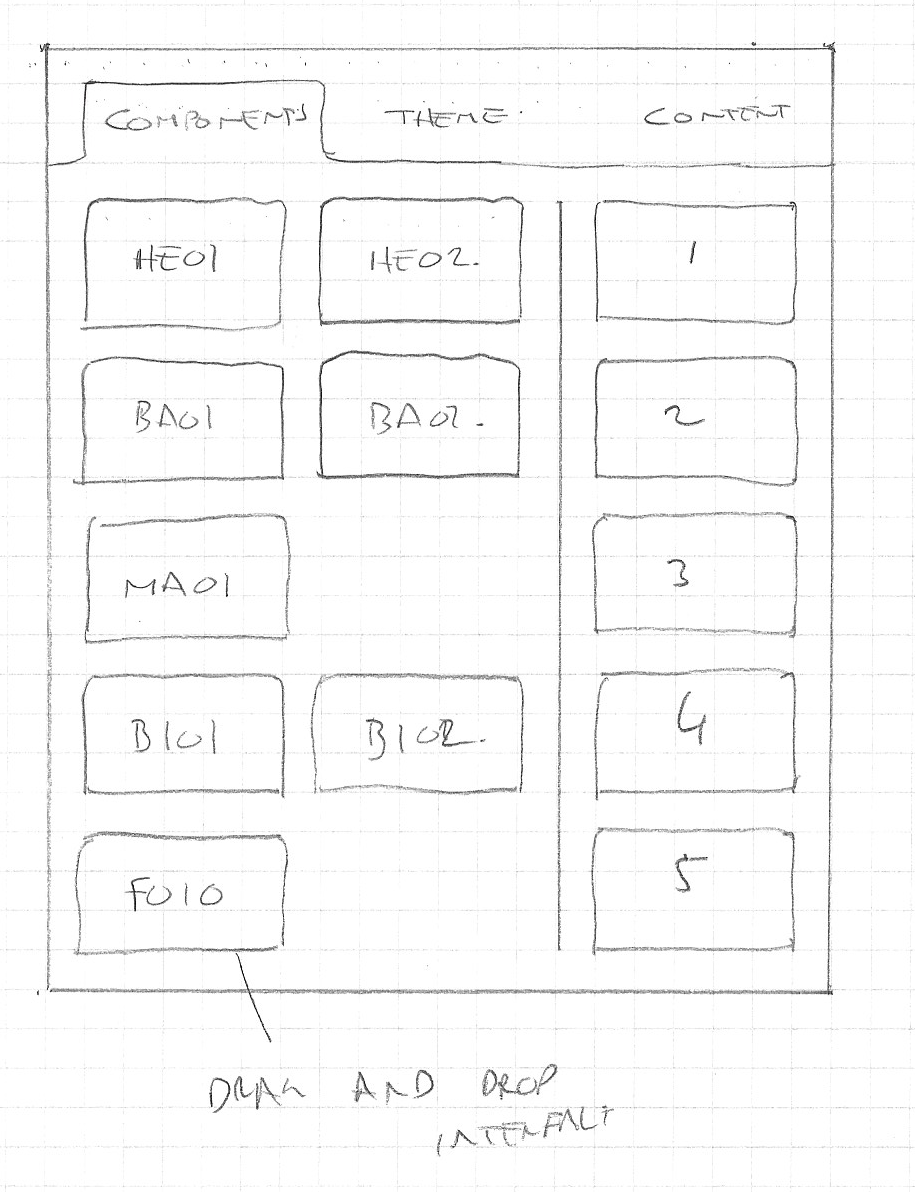
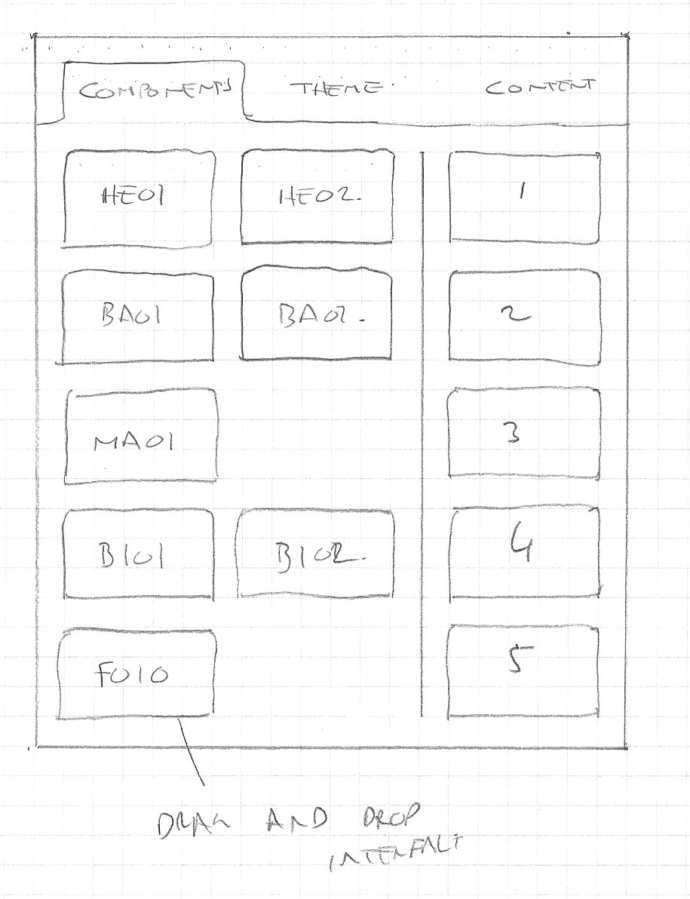
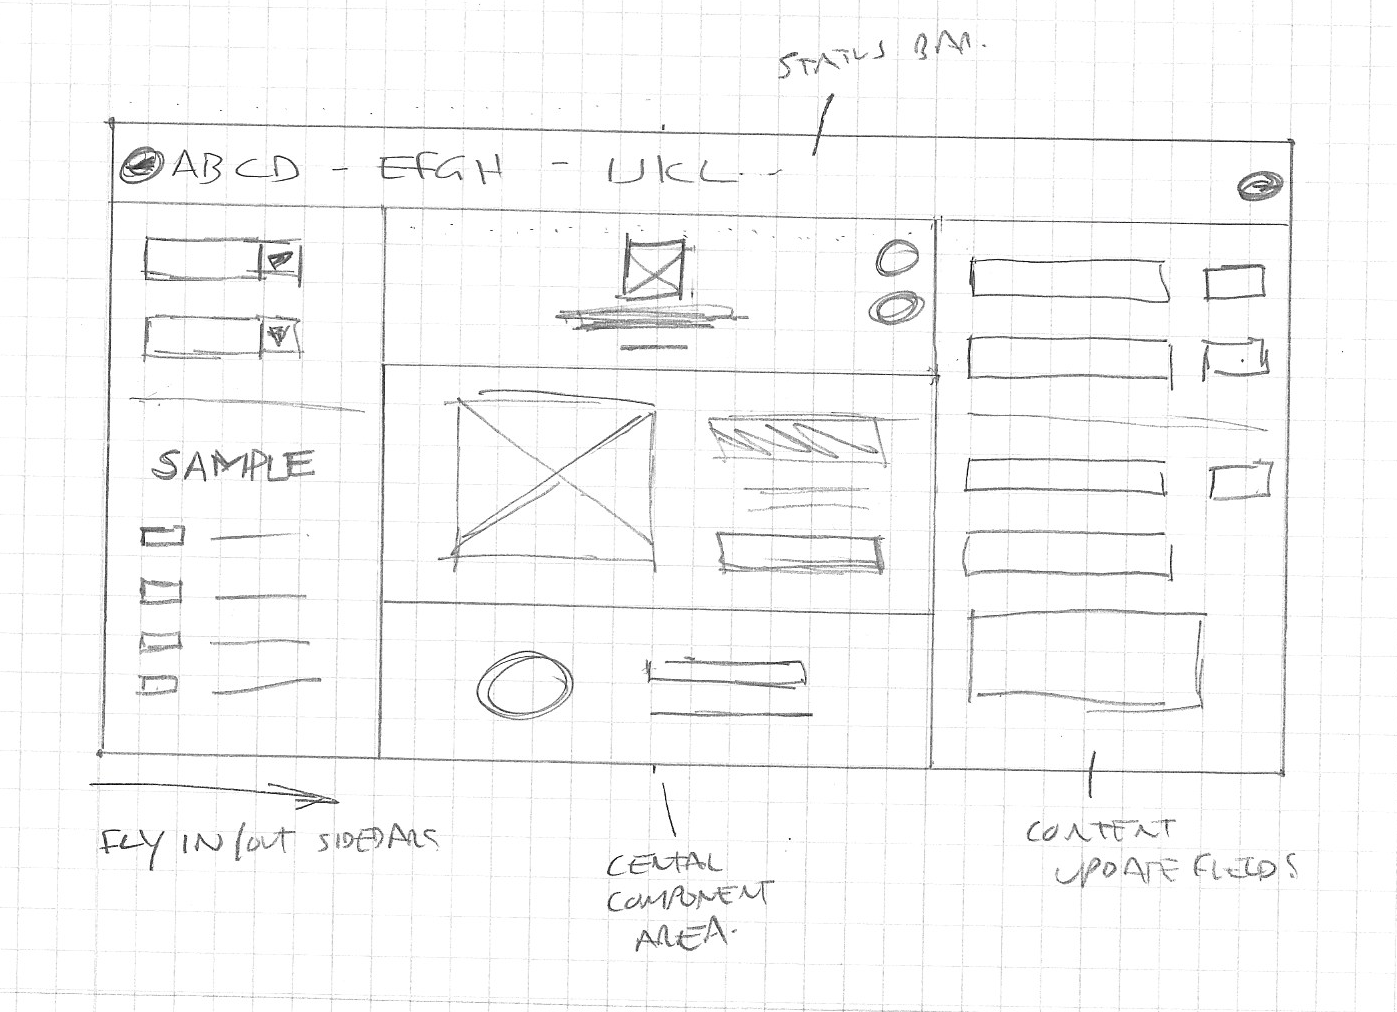
I like to work with a paper and pencil as much as I can. It is good to be away from a computer screen for a start, and certainly in the initial stages of a project it is much quicker and easier to sketch out ideas by hand.

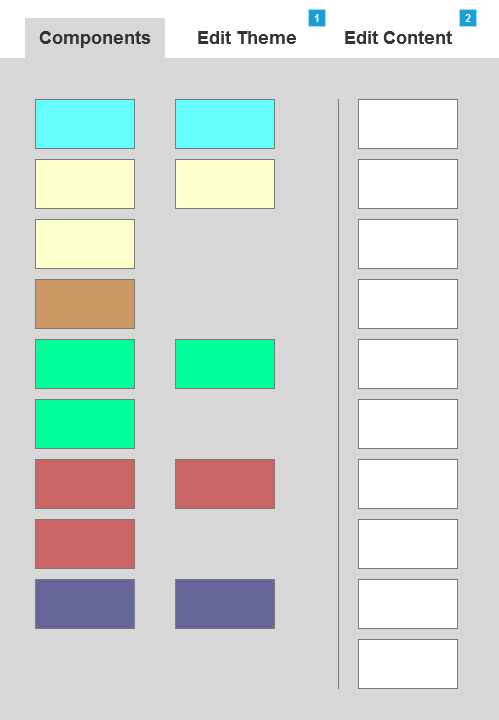
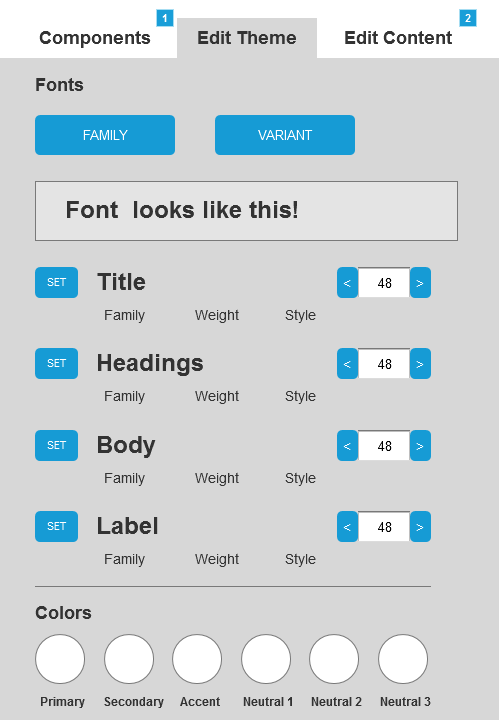
Once an approach has been agreed it makes sense to work something up in a tool like Axure to add more fidelity.

Animation Experiments

While doing some research for another project I found the website of web design agency Cuberto. I really liked their animated website and wondered how they went about building it.

I started playing around with my favourite slider plug in, Swiper, using the change in slide (and built-in amending of element classes) to trigger CSS animations.

So with the addition of some more javascript, I got something that works quite well. It is still a bit experimental, I have controlled the size of the window for desktops, and only really tested it on my iPhone 6S.

I learnt a lot working on this though:

  • Digging into the Swiper API
  • Custom Javascript functions to help control the navigation
  • Inline SVG’s and CSS
  • CSS Transitions

Now I want to dig around into some javascript animation libraries to see how much easier I could have made things for myself

Creating Plans in Excel

There are many different tools available for tracking projects, each of which can help with planning and scheduling work. Sometimes, though, there is room for a simple high-level plan. Excel can be a great tool to use to create this.

There are so many different project management tools that can create plans of different types, or help to assign and track work etc. Sometimes though I find it useful to create a basic plan to act as a visual aid for scheduling and risk management. This can be particularly useful if you want to maintain visibility of activity or events external to your team. For example, I worked on a large web project where we would add in high level marketing communication activity to make sure we weren’t planning to revamp the login/registration pages at the same time as a major media campaign driving traffic to the site.

Excel can be a great tool for producing this sort of plan. I am going to walk through the creation of a template that I use when drawing up these plans. The template contains a few different tricks and techniques for working with dates in Excel. Hopefully it might give you a bit of inspiration in the things you can get Excel to do.

We will build the template using the following;-

  • Built in Date Picker component to set start date of the plan
  • Basic Excel functions to populate our horizontal date axis
  • Conditional Formatting to highlight weekends months etc
  • A custom function to add month names to our horizontal date axis
  • A nice vertical line marker to highlight a date
  • Some macros to move this line about as required

Basic Spreadsheet and Datepicker set up

Open up a spreadsheet and make sure the Developer tab is visible. If it is not go to File > Options > Customize Ribbon and make sure Developers tab is checked in the right hand panel.

Enabling Developer Tab in Excel Options

Go to the Developers tab and click on Insert. From the resulting drop-down panel, select the bottom right ‘More Controls’ option.

Select the Microsoft Date and Time Picker control, and then add it to the top left of your spreadsheet – I have it around cell B3.

Select Microsoft Date and Time Picker

Make sure that Design Mode is switched on on the Developers tab. If you right click on the date picker object you can select the properties for this control.

About two thirds of the way down the list of properties you should the ‘LinkedCell’ property. Enter I5 to link the control to a cell on your spreadsheet and then give yourself a pat on the back!

Link the control to a cell on your worksheet

Now you can select dates in the date picker and see the selected date appear on the spreadsheet! But this is text string, which is not so useful for us. We can use the VALUE function to convert this to a number. In cell I8 type

=VALUE(I5)

and we get the text output of the Date Picker converted to an Excel Date number.

in cell J8 type

=I8+1

to increment this date. You can then copy J8 out to the right a bit to put incremental date number in row 8. This will form the basis of our plan.

Copy out formula to form basis of timeline

Tidy up the spreadsheet and prepare for more formualae

The next step is to resize some rows and columns. We want to shrink down our columns a bit to make our plan more visible and manageable. Select columns I to GZ and make them all 2.29 (21px) wide. That will extend our plan out to 200 days, which should be sufficient.

Rows from row 11 down will contain details of the activity and events appearing on our plan. I set up the rows in groups of three – the second of three to contain task bars and milestones etc, and the first and third to act as spacing rows. I do this because it gives me flexibility in formatting but you can set this part of the plan up in whichever way suits you.

So I resize rows 11 and 13 to 18.00 (24px) and row 12 to 33.00 (44px). I can then copy there three rows and paste them down further to make expand the rows in my plan.

If we add a shape to our plan (Insert > Shapes) we can access the Drawing Tools > Format tab. Under Align tools there is an option to Snap to Grid. We can now make our shapes snap neatly to the gird of cells we have just created.

Enhance our timeline with simple formula

Lets spruce our timeline up with a couple of simple formulae.

firstly copy the formula in cell J8 out to populate out 200 days worth of columns. Copy J8 (=I8+1) to cells (K8:GZ8). This row of Date Numbers is going to drive our entire timeline.

Then in cell I9 enter

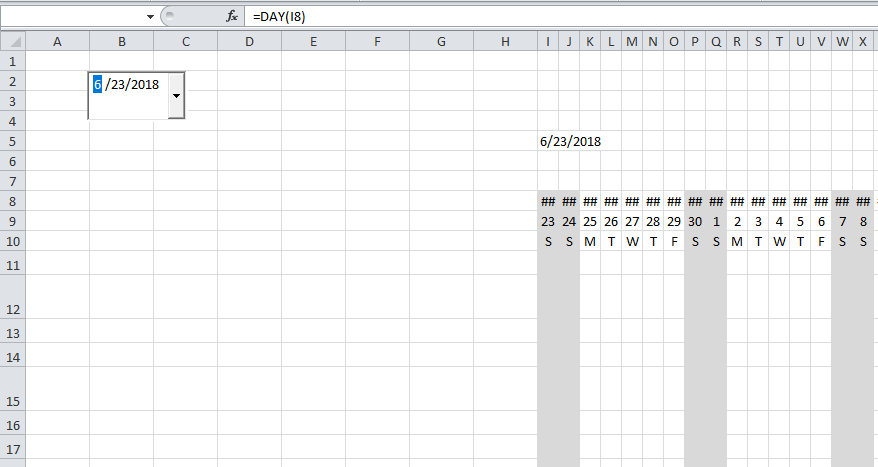
=DAY(I8)

This will take our date number and return the day of the month. Copy this formula to cells J9:GZ9 and you should see the days of the month for all our columns. Pretty nifty stuff! You can experiment changing the date using the date picker control and see the days of the month change accordingly.

We definitely want to be able to see which days of the week correspond to these days of the month. We are going to use a VLOOKUP function for this step.

The VLOOKUP is one of the most useful Excel functions but it requires a bit of set-up.

Click on another tab to go to another worksheet within the same document. We are going to create a little table of data and use a vlookup function to pull information through to our timeline.

You need to create a little table of data, two columns wide and eight rows deep. The top row holds titles, the rest of the first column the numbers 1-7, the rest of the second column, “M”,”T”,”W”,”T”,”F”,”S”,”S”.

Select this little table and give it a name, something like “weekday_text” in the field just above the top left corner of your worksheet.

Set up VLOOKUP table

Skip back to your main plan worksheet and go to cell I10. We are going to write a formula that looks at the date number for this column (in cell I8). We are going to use the WEEKDAY function to return a number from 1 to 7 that corresponds with the day of the week. We will then use a VLOOKUP function to take this number and return a single letter from our weekday_text table.

type in “=WEEKDAY(I8,2)”. Copy this forumla along the row and you will see numbers repeating from 1-7, corresponding with days of the week.

We need to nest this in a VLOOKUP to convert it to a letter from our table. Go to cell I10 and add in “VLOOKUP(” following between the “=” and the WEEKDAY function. This starts our function, and specifies the first parameter, the number that we want to look up.

We can complete the final three parameters, the table we want to lookup in, the return column number, and whether we want an exact match. At the end of your weekday function add the following, “,weekday_text,2,FALSE)” and hit return. This should now be taking our weekday number, looking it up in our table and returning the correct letter from column 2.

Worksheet pulling day letters from VLOOKUP table

Add a bit of conditional formatting

What we really need now is some visual cue to highlight weekend days

We can use Conditional Formatting to achieve this – we can change the fill color of weekend cells, and makes this change dynamically if we change the start date of our timeline.

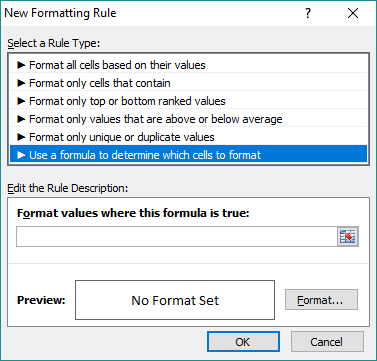
Click on any cell in the main part of the plan, for example I9. Now click on the Conditional Formatting command on the Home Tab and select New Rule to display the conditional Formatting window.

Select “Use a Formula to determine which cells to format”.

Use Formula to determine which cells to format

Excel will apply some special formatting to the cell when our formula evaluates as true. We want a formula that evaluates as true for ‘weekend’ cells. We can use our weekday function on cell I8 to return our number from 1-7 and evaluate as true for numbers 6 & 7. We write this as “=WEEKDAY(I8,2)>5”.

So far so good, but we want to apply this formula to our entire range. For any cell we want the formula to return a weekday number based on row 8 of current column and evaluate a TRUE if it is over 5. We just need to add in a “$”before the 8 to make sure this becomes an absolute reference. So we get “=WEEKDAY(I$8,2)>5”.

Once you OK the formula you can specify a format for these cells – click on the Format rectangle and add a light grey fill to these cells.

You can then specify the cells it should apply to. I have it applying to “=$I$9:$GZ$115”. If you then click on OK you should see your light grey formatting applied to all the Saturday and Sunday columns on your plan. And if you change the Start Date with your Date Picker control it should all update automatically!

Dynamic Shading of Weekend Columns

Virtual Box & Turnkey Linux

Turnkey Linux pre-built appliances run locally in Virtualbox can be a really flexible and useful tool.

Virtualbox really is a great piece of software. I know a lot of people use it so they can easily access another OS from their desktop.

I have also found it a really useful tool as an aid to web development – especially when used with some pre-built appliances from Turnkey Linux.

Turnkey Linux have dozens of prebuilt ‘appliances’ available for download. These are prebuilt virtual machines, with different software loaded onto a preconfigured LAMP stack.

These include things like WordPress, Drupal and Joomla but also include other things like invoicing, LDAP and CRM tools.

Below I have given an overview of a couple of use cases where I have found Virtualbox/Turnkey Linux really useful.

Easy Temporary Web Server

Local Virtual Server used as a temporary web server

I needed to build a WordPress site and needed some form of local environment for development purposes. I also needed to occasionally give access to the client remotely.

It takes about 10 minutes to download and install the Turnkey Linux – WordPress appliance – all installed on a Linux OS with Apache, MySQL and PHP set up and ready to go.

I really like this solution:-

  1. It is quick and easy to set up
  2. It is easy to take snapshots of your virtual machine and revert back to previous versions.
  3. Once you have your machine set up the way you want it is simple to clone it.
  4. Once you have finished it is quick and clean to just delete an old machine.
  5. If you set up NAT rule on your router you can easily expose your virtual machine to the web. This is great if you are collaborating with someone.
  6. It’s also a great way to way to learn more about Linux and BASH.

SCSS Preprocessing

Local Virtual Server used as to compile SCSS in dev pipeline

I like to use SASS/SCSS in my development pipeline using Gulp to compile my code into CSS.

Unfortunately I manage a site that sits on a server that doesn’t have node.js so was unable to get Gulp installed.

I came up with a workaround using a local virtual machine preloaded with node.js. Again, this took about 10 minutes to download and install from Turnkey Linux.

I could then mirror the CSS files from the WordPress installation onto this virtual machine.

Finally I created a set of Gulp tasks to compile my SCSS files into CSS, and then FTP them over to the correct location on the WordPress server.

There may well be other ways of achieving these thing – but these both worked for me pretty well. Hopefully they may give you some ideas on how you can use Turnkey Linux in your own projects.

The Power of Gulp

In an earlier blog post I discussed the use of a Virtual Server as a Gulp/SCSS compiler. Now it is unlikely that many other people would have a similar requirement, but I thought it would be useful to go through the steps I went through as they may be of use in some other context.

Set up a virtual machine

Firstly go to Turnkey Linux and download a node.js appliance.

You should be able to download a VM and import it into VirtualBox.

Create Project Folder

Next, create a project folder. I called my folder ‘processing’ and created sub-folders called ‘src’ and ‘dist’. Copy over your CSS file to the ‘src’ folder and give it an .SCSS extension.

The plan is to use Gulp to compile this source .SCSS file and save it as a CSS file in the ‘dist’ folder. Another Gulp task will then FTP all of this over to the other server.

Install gulp on the VM

Next up, use NPM to install Gulp globally on the virtual server. You need to use putty to gain SSH access to the virtual server and then run the following command.

Sudo npm install --global gulp

Set up a Gulp Project

Now that you have Gulp installed globally you can set up your Gulp project.

The first thing to do i to CD to your project folder.

npm init

This will create a package.json file with config details of your project. We just need to put in some basic config details. It will also create an node-modules folder to keep all the Gulp packages we need.

{
  "name": "Gulp",
  "version": "1.0.0"
}

Install Gulp Modules

The first thing to do is to install the main Gulp package.

npm install --save-dev gulp

One of the strengths of Gulp is the multitude of plugins you can use to accomplish different tasks.

We are going to use the following plugins in our gulp tasks.

gulp-concat
this plugin concatenates files together into a single file.
gulp-clean-css
the plugin helps tidy up CSS.
gulp-sass
this plugin compiled SASS and SCSS into CSS.
gulp-rename
renamed destination file.
vinyl-ftp
FTP utility for copying files.
run-sequence
Runs a sequence of tasks.
gulp-sourcemaps
particularly useful when concatenating files, this allows your debugger to see where code sits in sourcefiles.
gulp-util
genral utility for hlp logging FTP activity

Enter the following bash command to download them all.

npm install --save-dev gulp-concat gulp-clean-css gulp-sass gulp-rename vinyl-ftp run-sequence gulp-sourcemaps gulp-util

Once this has completed you should be able to see all of these modules sitting in your nodes-modules folder.

Create Gulp File

Next step is to actually create our Gulp file – this will contain details of the tasks we are setting up.

Create a file called gulpfile.js in your project folder.

This file will contain the following things.

  • References to all the modules we need to complete our tasks.
  • Variables containing file paths.
  • A task to take any CSS and SCSS files sitting in our src folder, concatenate and compile to CSS and save resulting file in our dist folder.
  • A task to FTP the src and dist folders over to another server.
  • A task that executes these two task in sequence.
  • A watch task, that will monitor the ‘src’ folder and execute the SCSS and FTP tasks on any change to any file.

Module References

The first thing we need to include is references to all the modules we have installed.


var gulp = require('gulp');

// require other packages
var concat = require('gulp-concat');
var cssmin = require('gulp-clean-css');
var sass = require('gulp-sass');
var rename = require("gulp-rename");
var ftp = require( 'vinyl-ftp' );
var runSequence = require('run-sequence');
var sourcemaps = require('gulp-sourcemaps');
var gutil = require( 'gulp-util' );

We can then reference these modules in our tasks using these variable names.

Folder Path Variable

Next up we can create some variables pointing to our ‘src’ and ‘dist’ folders.


// variables
var paths = {
  css: {
	src: './src/css/*.{scss,sass,css}',
    dest: './dist/css',
    opts: {

    }
  },
  js: {
    src: './src/js/*.js',
    dest: './dist/js',
    opts: {

    }
  }
};

This is not obligatory, you reference paths directly in your tasks, this is just a bit easier to maintain.

Processing Stylesheets

The next task will process all the CSS, SASS and SCSS files on our ‘src/css’ folder.


// Process and Create DIST CSS - Run Styles
gulp.task('styles', function() {
  return gulp.src(paths.css.src)
    .pipe(sourcemaps.init())
	.pipe(concat('mystyles.css'))
    .pipe(sass())
	.pipe(sourcemaps.write('.'))
    .pipe(gulp.dest(paths.css.dest))
    .pipe(cssmin())
    .pipe(rename({
      suffix: '.min'
    }))
    .pipe(gulp.dest('./dist/css/'));
});

This task takes all the files in the ‘src/css’ folder and concatenates them all into a file called mystyles.css. It saves this file in the ‘dist/css’ folder, then saves another, minified version in the same folder.

The sourcemaps plugin tracks all of these changes in a sourcemap. Pages that call the single mystyles.css file can be viewed in Chrome Developer Tools for example and the sourcemap will link back to the original source files allowing for easy debugging.

FTP converted files

The next task is a simple FTP task to copy over our ‘src’ and ‘dist’ folders to the other server.


// FTP dist to gtv309
gulp.task('ftp-dist', function(done){
  
 var conn = ftp.create( {
        host:     'HOST',
        user:     'USERNAME',
        password: 'PASSWORD',
        parallel: 10,
        log:      gutil.log
    
 });
    var globs = [
        'dist/**',
        'src/**'
           ]; 
		   return gulp.src( globs, { base: '.', buffer: false } )
       .pipe( conn.newer( '/LOCATION/ON/SERVER' ) ) 
        });

This task creates an FTP connection and transfers the contents of the ‘src’ and ‘dist’ folders over to your chosen /LOCATION/ON/SERVER. Or rather those files that have changed only.

You can check the vinyl-ftp module for more information on usage.

It should be possible to store username and password in an external file – as this is just sitting in a virtual machine on my laptop I haven’t deemed this necessary.

Sequence them together!

The next task uses the run-sequence module to sequence them together.


// compile and commit
gulp.task('style-commit', function() {
  runSequence('styles',
              'ftp:dist',
              );
});

Setup the watch task

Finally we can create a watch task to monitor the ‘src’ folder and run our style and ftp tasks when a new version of a file is saved.


gulp.task('watch', function () {
var watcher = gulp.watch('./src/css/*.scss', gulp.task('style-commit'));
watcher.on('change', function() {
	runSequence('styles',
              'ftp:dist',
              );
  console.log('File was changed');
});
});

Test that everything works

If you go to putty you can type in the following command.

gulp --tasks

This should show you a list of all you tasks if the are correctly set up. It will throw errors if a module is missing. Don’t be worried if you get an error like this, I have found it is usually a missing module, or an incorrectly named variable that can be identified quickly.

Once this task is executing ok you can go through each of the tasks to make sure they work ok.

gulp styles
gulp ftp-dist
gulp style-commit
gulp watch

Once you run your watch task any changes you make to a src CSS/SASS/SCSS file should automatically instigate your styles task, and then FTP the results over to the server.
Environmental Enforcement App

Innovative App for Environmental Enforcement Officers

Develop App to

  • Enable remote filing of paperwork
  • Allow remote access to departmental databases
  • Increase productivity
  • Increase time spent in field

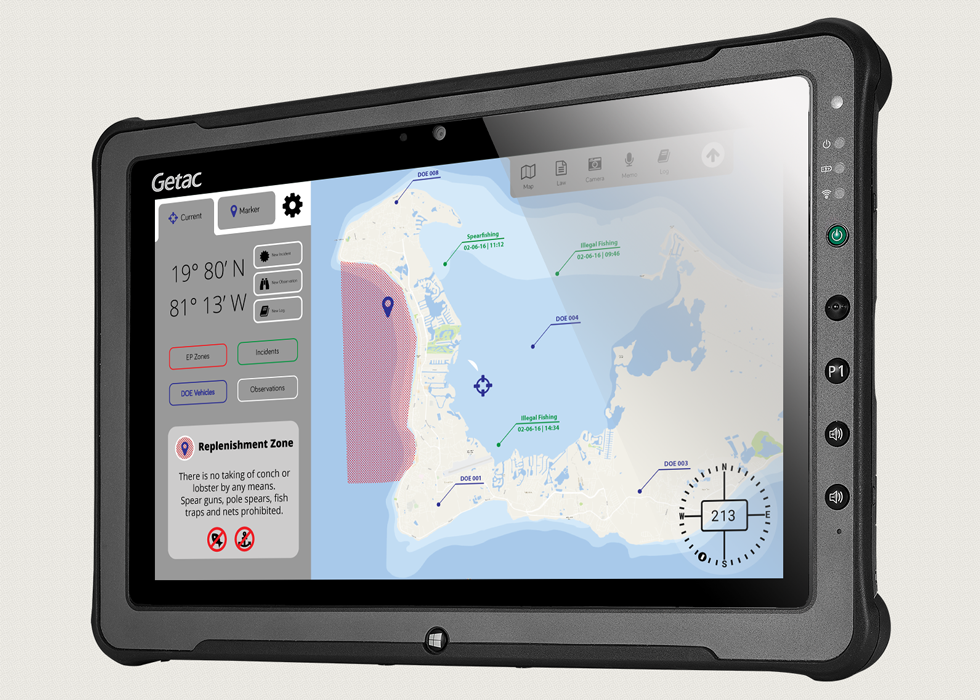
The Cayman Islands Department of the Environment wanted to develop a tablet app for use by their Enforcement Officers. The aim of the app was to streamline certain processes, allow the officers to file paperwork remotely and increase productivity, allowing them to spend more time in the field.

Getting Started

The delivery team was made up of myself, coordinators from the Department of the Environment and academics from Bangor University. An initial meeting allowed the different team members to agree a broad scope of the project and a delivery plan.

Iterating and Refining the Design

I delivered further iterations of the interface design over subsequent meetings. I was able to present designs to the End Users of the app, the Enforcement Officers and obtain their feedback. In the first meeting I worked up some rough paper designs. I took these and built some basic wireframes in Axure to present at the next meeting. These in turn got annotated and reworked until we had a design that met the Enforcement Officers needs.

Developing Limited Axure Prototype

The wireframes became more detailed as the project went on. I had to add in some interactivity to my Axure model to help demonstrate a couple of areas of functionality to the Enforcement Officers

Map Interface

A lot of the app was based on a map, that could superimpose different layers of GIS data to the Enforcement Officers. It also allowed them to prepopulate geographical coordinates into any form they were completing via the app. I found that prototyping this functionality helped to demonstrate my proposed UI which in turn led to some specific feedback that got integrated into my design.

Database Integration

Enforcement Officers also were being given the ability to search databases of vehicles and known poachers. Matching data could in turn be inserted into a forms on the app. The Axure repeater functionality really helped to bring my initial UI ideas to life, which in turn led to more feedback and a more robust design.

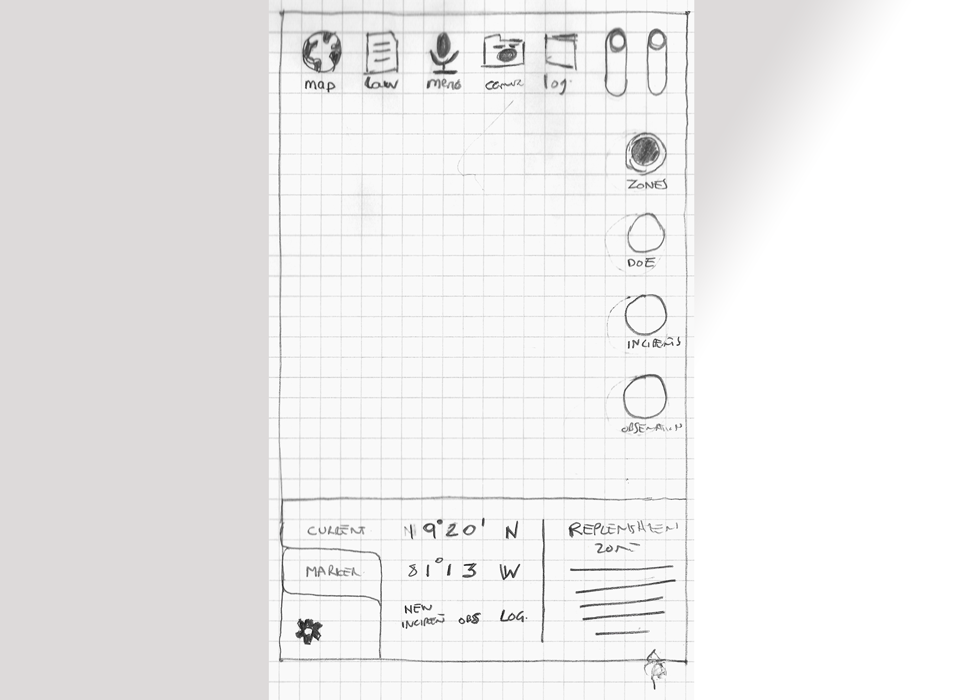
Paper Prototyping captures requirements quickly and allows for immediate revisions
Intially a portrait layout was considered and worked up into a wireframe

GOV.KY 4.0 – Consistent Look and Feel

The portfolio of sites we managed had been developed incrementally. Although most of our sites shared some common features, each had a distinct look and feel. These were time consuming to produce and maintain also potentially confusing for our users. We felt that a common design would be of benefit to our users: Browsing any site would help provide familiarity with any other site developed using the same framework.

The key things we wanted to achieve with the design were:

  • Promote Clarity – we wanted to cut back on the image and details and deliver a simple, clean design as we felt this would make it easier for users to find information.
  • Modern Design – The Cayman Islands Government was often considered conservative and old-fashioned. We felt a modern design would help highlight the forward-thinking, progressive side of Government.

Flexible and Scalable

The Cayman Islands Government included agencies of varying sizes from small two person units to large ministries employing hundreds of people. We needed a framework that would work well for the smaller units with less information to publish as well as the larger entities who published new information daily.

We developed a modular design that worked in a stripped down version, yet could be easily expanded by agencies with more complex requirements.

Allow for some individuality

Although we felt there were clear benefits in having a consistent design for all we also know different site owners would still want their sites to have some individuality. We achieved this in the following ways.

  • No set page layout – although we had a standard layout as jumping off point, it was possible to customise this by adding in additional components, or different versions of components.
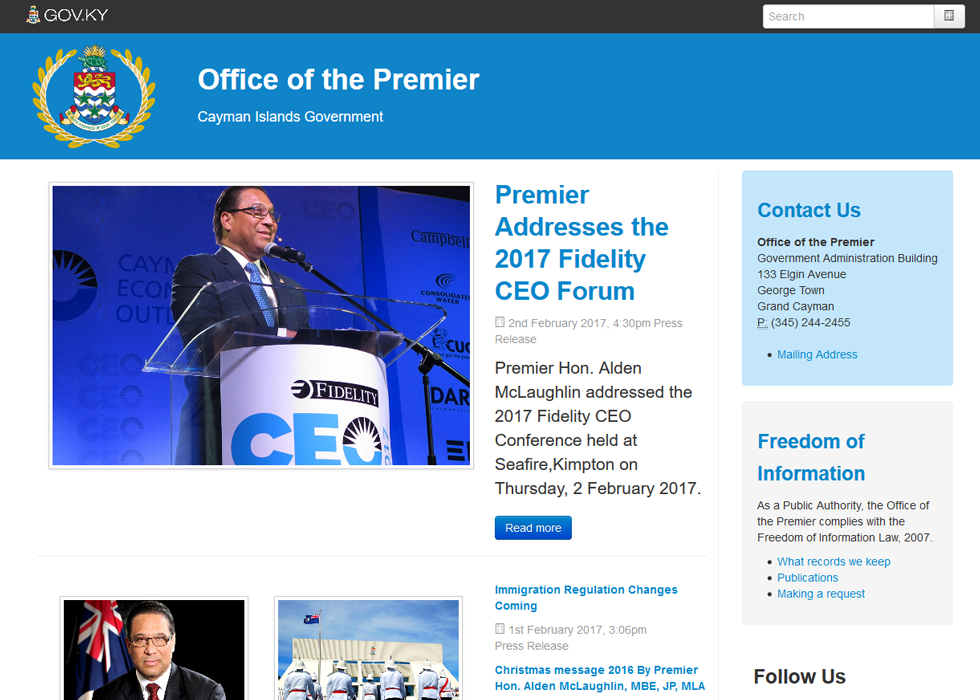
  • Logos and other graphics – If agencies had their own logo we were able to incorporate it into the header area of the site. There was also some scope for incorporating custom graphics in certain areas of the site.
Inclusion of agency logos while maintaining consistency
Basic site showing new look and feel
More complex sites maintain consistency with modular page components

GOV.KY 4.0 – Improving Findability

When reviewing user feedback, a consistent theme was the difficulty people had in locating information. Often this information had been published but was just hard to find. Information was organised according to government agency, and we realised that users often did not know enough about the organisational structure of government to find what they were looking for.

Develop meaningful structure of entire web estate

The sites we managed fitted into three tiers:-

  1. One single main government site acted as a primary destination.
  2. Ministry/Portfolio sites published policy and aggregated news.
  3. Individual agency sites housed contact details, online services and news and other documents.

Defining ‘Web Services’

We started trying to identify what people wanted when they visited government websites.

Information Sometimes people were looking for a specific report or document but often they were looking for guidance on a particular process.

Download Forms Often people were looking to download certain official forms.

Online Transaction In certain cases, online services existed allowing users to perform certain transactions online.

We felt that a lot of these could be considered as ‘web services’. We did some work to make sure that this content was labelled in a clear and consistent manner, and in some cases collated information to make more comprehensive ‘guides’.

One Index to rule them all

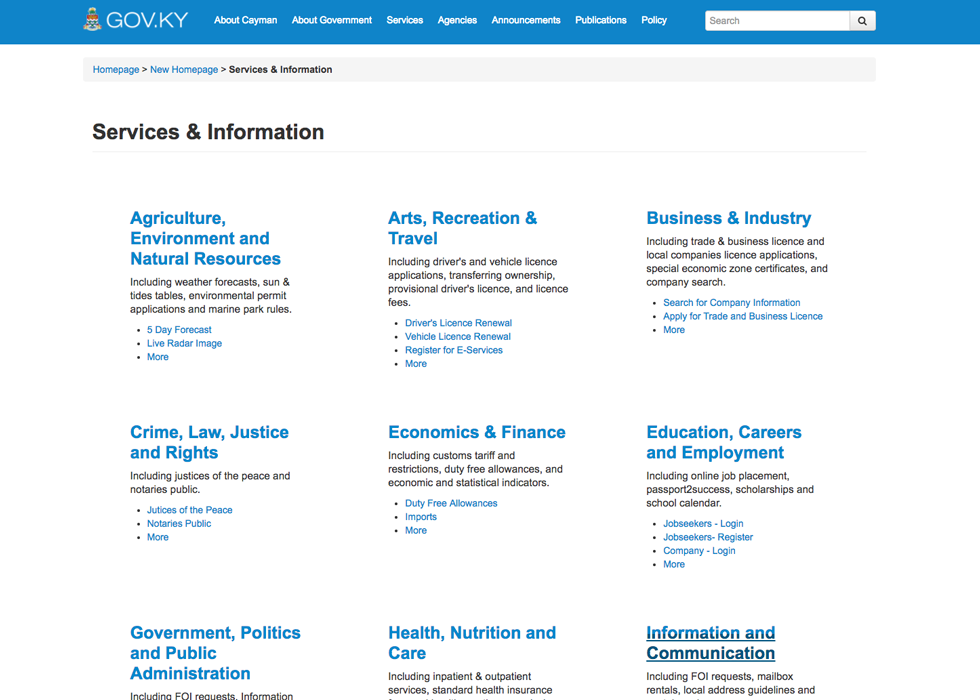
We developed a new gov.ky portal site containing key information on the Cayman Islands and it’s government. This portal also contained an index of all the web services we had indentified. This meant that users had a single destination from which they could be redirected to other content. This content was indexed by meaningful categories to help connect users to the content they required.

Embracing the PDF

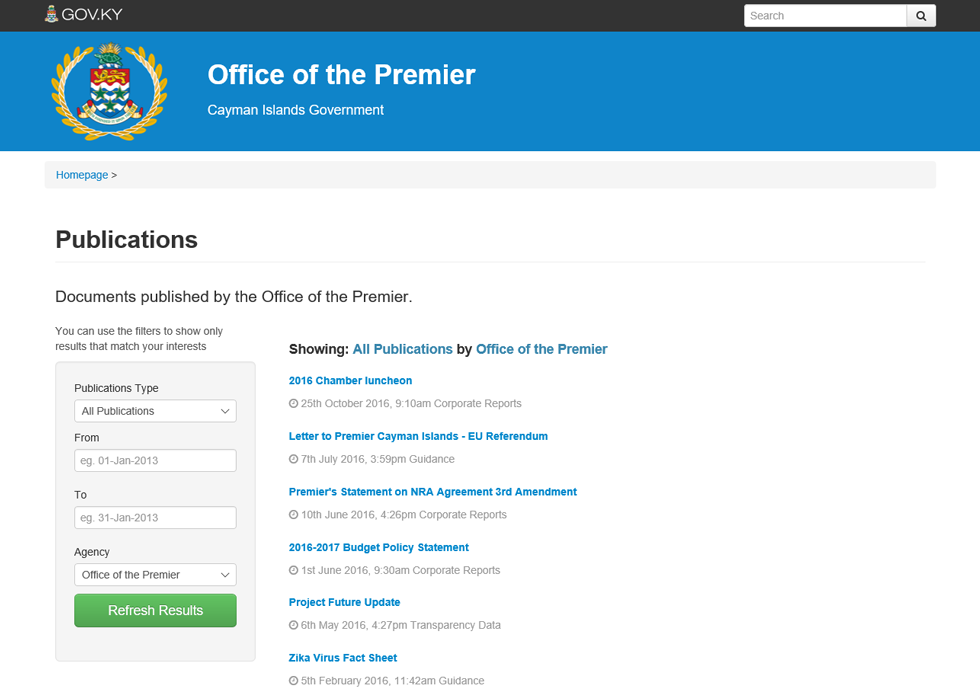
We realised that a lot of government information was circulated via PDF document. In the past we had tried to mark up this up and publish as HTML. There was a significant resource overhead to this approach. We decided to accept that the PDF was the currency of information with CIG, and develop the framework to make it easier for government employees to publish PDF’s and for users to search and locate information in this format. We developed our document publishing to enable the creation of document collections, including updated versions of documents. We also developed tools so that users could filter their searches by publication date, document title and publishing agency.

I developed a structure & guidelines for entire Government Web Estate
We produced a categorised index of key government information in a single location
We developed collections that grouped related documents handled multiples versions and included metadata
We devloped tools to help users locate documents and collections of interest

GOV.KY 4.0 – Responsive Design

We identified Bootstrap as the best way to allow us to produce fully responsive websites.

Update our site templates

With a bit of trial and error we successfully referenced the bootstrap libraries from the page templates within the Oracle Portal CMS. We were able to build a demo site and start getting to grips with the tool to build responsive webpages.

Develop modular page layouts

Once we had got to grips with the naming conventions in Bootstrap we started developing some basic page layouts.

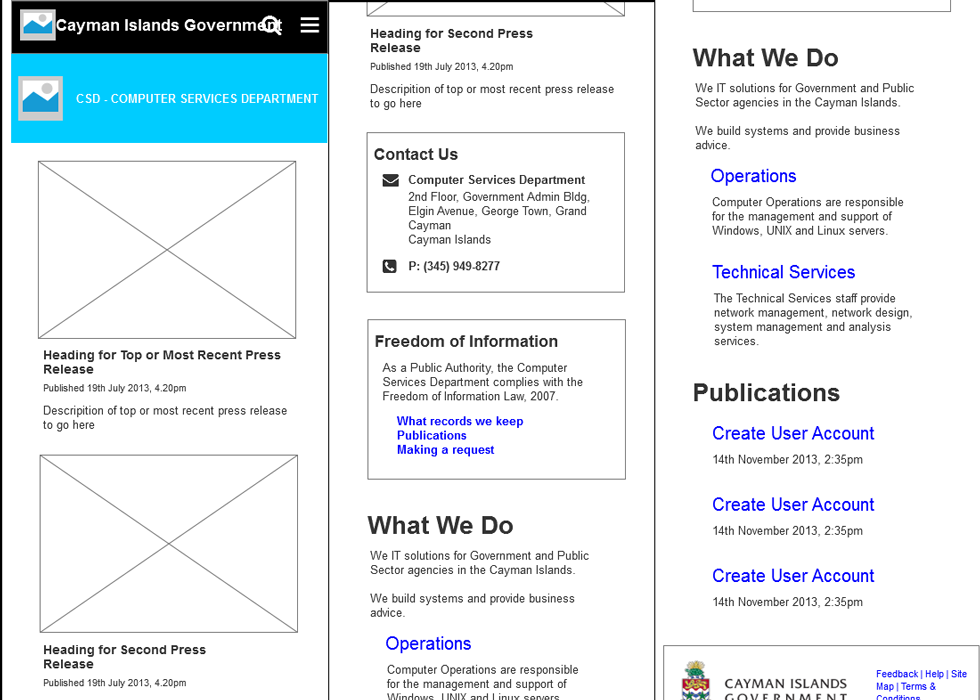
On Mobile First I produced some desktop wireframes in Axure and added mobile views. Not mobile first, more ‘mobile very early on’. I then worked on both in parallel in Axure, and added in intermediate layouts. I had four views of each wireframe, mobile phone portrait and landscape, tablet portrait and desktop/tablet landscape

At this stage I did a fair bit of work within Axure, sketching out some basic pages, and working with the rest of the team to quickly build prototypes using our CMS in our development environment.

We iterated a few times, learning more about bootstrap, building some pages and testing on our mobiles devices.

Develop common components

At this point we had a working page that rendered nicely in multiple devices in both portrait and landscape orientation. It included a header and footer, and some initial page components to display contact details and recent press releases.

Page Components

In Oracle Portal, content is added as an ‘Item Type’. These allow content of varying forms – text, HTML, documents, images etc to be added to a site using an online wizard. The content is stored in a database along with associated metadata. When added to a page they are wrapped in some custom html.

We developed new versions of our page components that were wrapped in Bootstrap compliant HTML. We also developed summary and reporting components to display multiple items, again wrapped in Bootstrap compliant HTML.

Pattern Library We added all new components to a demo site so we could easily review them as we worked. This allowed us to work faster, and maintain consistency

As we developed more sites using the framework, we needed to build some different components.

  • We confirmed that a new component was required
  • We reviewed our other sites and came up with requirements that might work on multiple sites
  • We reviewed the visual design of our existing work and made new components consistent

Test on mobile devices

We utilised online tools too emulate certain mobile devices, but nothing beats testing on real devices. All of our new work would be tested on whichever devices were available. Obviously throughout the team we had a selection of mobile devices and tablets to use for testing. Also we asked any visitor to the team about their mobile devices to see if we could do some quick testing on a new platform.

Initial wireframes show proposed mobile page layouts
Axure allows for development of responsive versions of wireframes
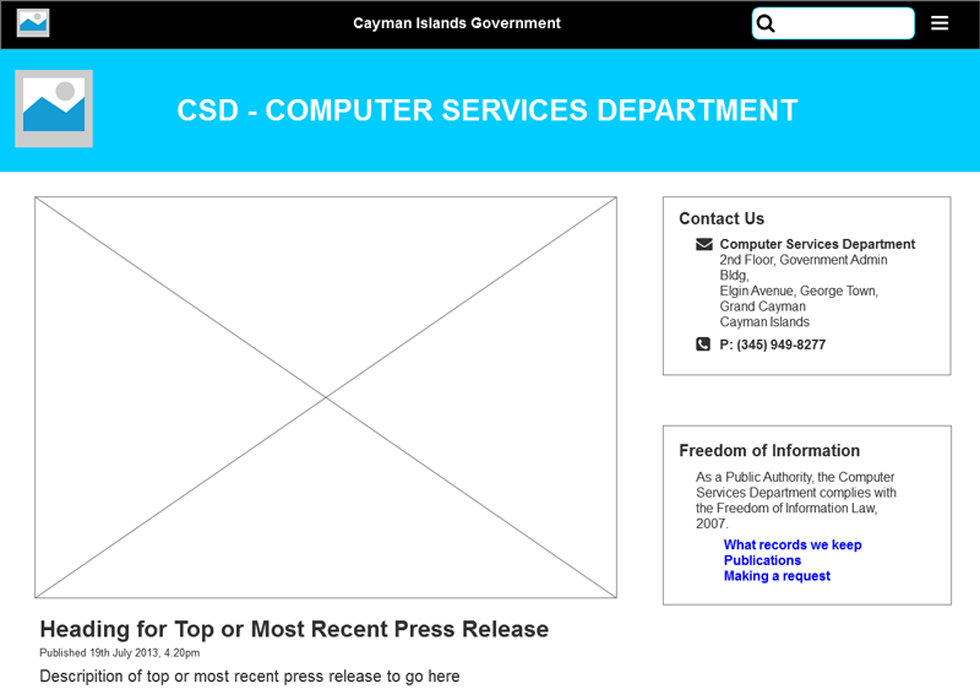
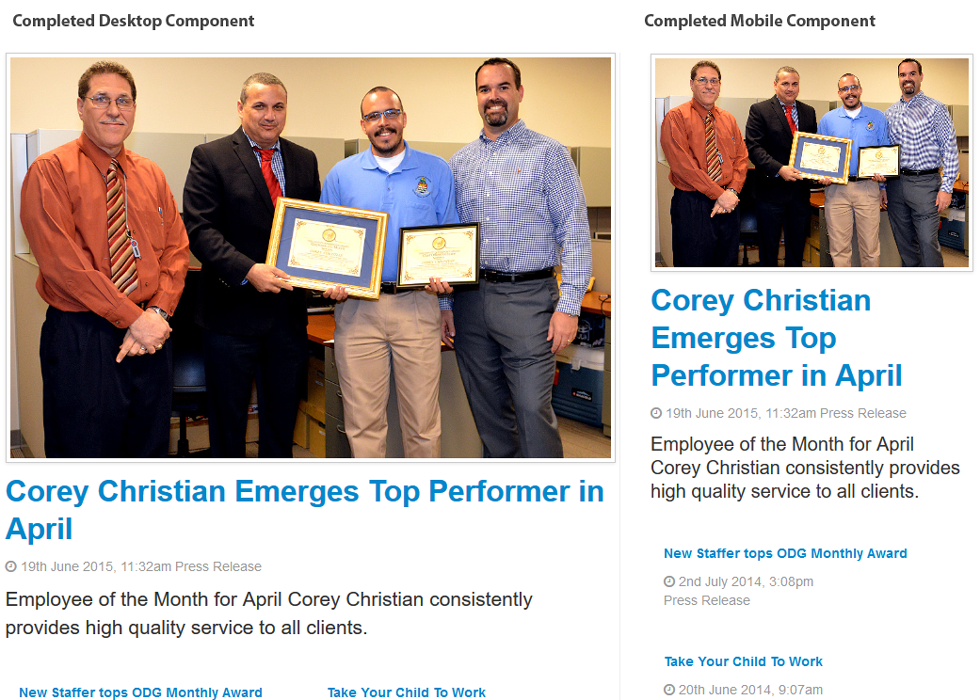
Mobile and desktop wireframes of Press Releases component
Completed versions of component taken from live site

GOV.KY 4.0 – Guerilla Redesign

Redesigning Cayman Islands Web Estate

In 2012 I was working for the Cayman Islands Government. The Cayman Islands Government (CIG) Web Estate consisted of approximately 80 sites, of which my team had developed and were providing support for about 50%. This portfolio was growing unmanageable and we needed to come up with a new approach.

Legacy Issues

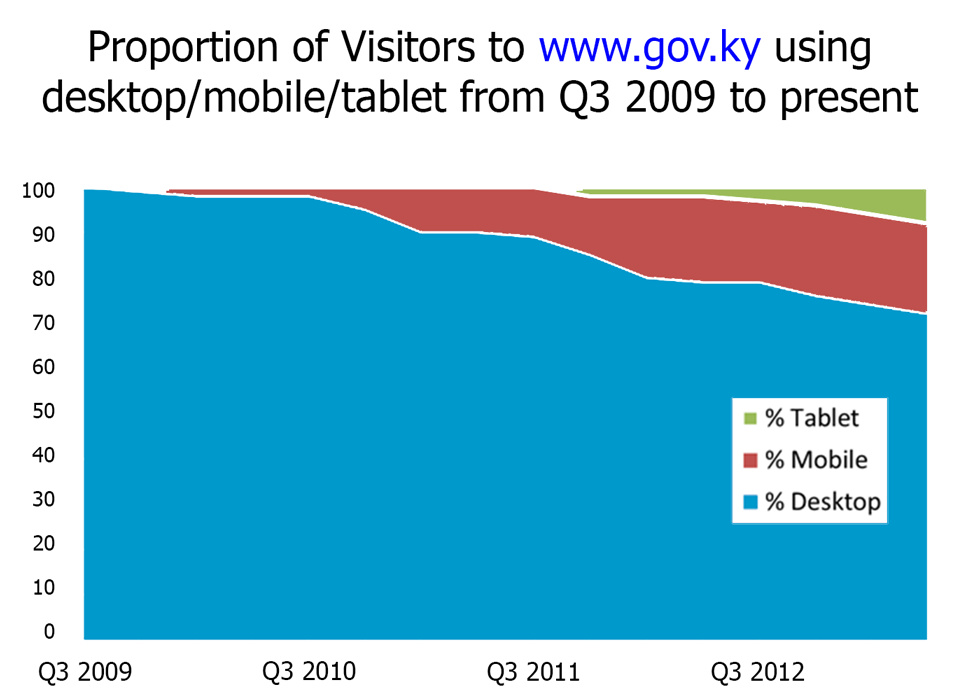
Research showed increasing mobile users
  • The biggest gripe we identified from user feedback was how hard it was to find information on Cayman Islands Government websites. When we investigated, we found that often the information had been published somewhere, it was just difficult to find.
  • A review of our web analytics also showed that more and more people were trying to access our sites from mobile devices. It was important for us to offer a better experience for the mobile browser.
  • Over the years the number of sites managed by the web team had increased – however the actual size of the team was growing smaller. Many sites had had distinct layouts and visual designs. These took time to create. We were not delivering new sites quickly enough, and maintenance of existing sites was very time-consuming.
  • Our sites were all built using the Oracle Portal Content Management System – this tool was very nearly obselete, but unfortunately as our whole department ran on Oracle products we knew we had little chance of moving to a different platform. Any new approach would have to be developed on the Oracle Portal platform.
  • We also know that there were organisational issues to overcome. the Cayman Islands Government was a pretty conservative organisation and we were pretty sure there would be some resistance to the changes we knew we should make.
  • IT services within Cayman Islands Government lacked leadership and strategic focus.
  • More and more people coming and asking for an ‘App’ and having only the vaguest idea of what they wanted the app to do.

We needed to come up with a new approach that would allow us to manage our portfolio more effectively.

Requirements

After some discussions within our team we realised that we needed develop a single framework that we could use for all the websites that we managed, and for any new sites we built.

This would cut out time-consuming information architecture and visual design work from our build cycle. We could then deliver sites quicker and cheaper.

The framework needed to be responsive and achievable within the constraints of the Oracle Portal CMS.

After more meetings and discussions within the team, we identified the following critical requirements of our new framework

Consistent Look and Feel – We wanted a modern look and feel that we could apply to all of our sites. It was important to develop a framework that would work equally well for the website of a small unit as well as a large ministry.

Responsive experience – It was important that anyone accessing one of our sites using a mobile device had a good browsing. It was also important for us to be able to deliver a consistent responsive experience with the minimum of effort.

Improved Findability – The framework needed to make it easier for our users to find the information they were looking for.

Policy Document/Briefing Note

We also thought about how best to communicate and influence other stakeholders, such as Heads of Department and other site owners.

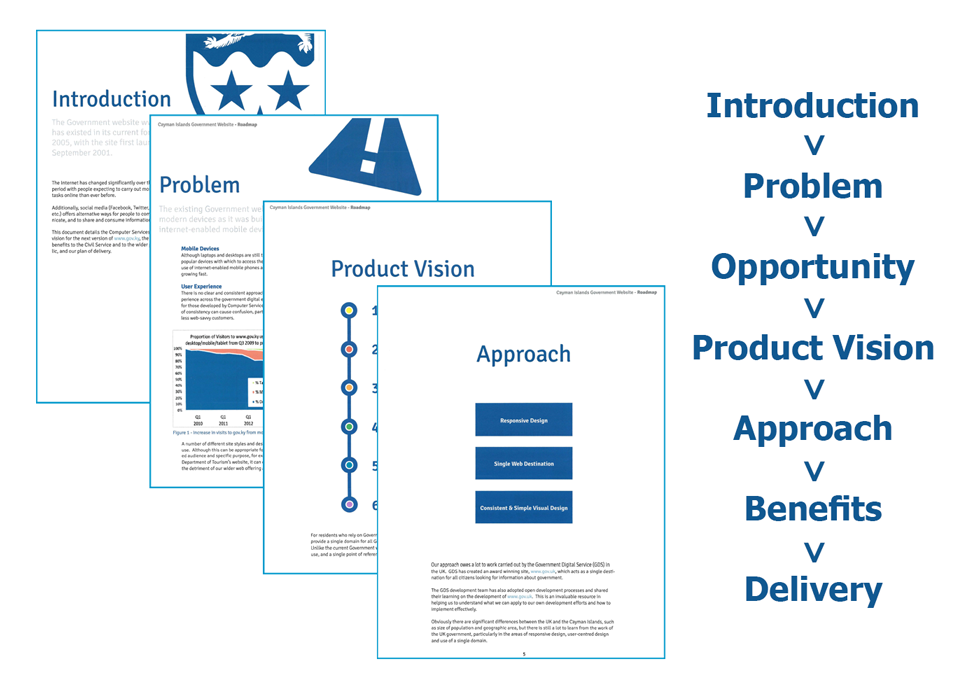
We developed a summary document detailing the changes we were planning to make, backed up with research demonstrating the need for these changes.

The document gave us the opportunity to:-

  1. Give an indication of the modern, clean, flat design direction we were planning to take
  2. Demonstrate the capabilities of our team to deliver thoughtful and professional work
  3. Communicate our plan and roadmap
Briefing document explained need for changes and previewed style

Roadmap

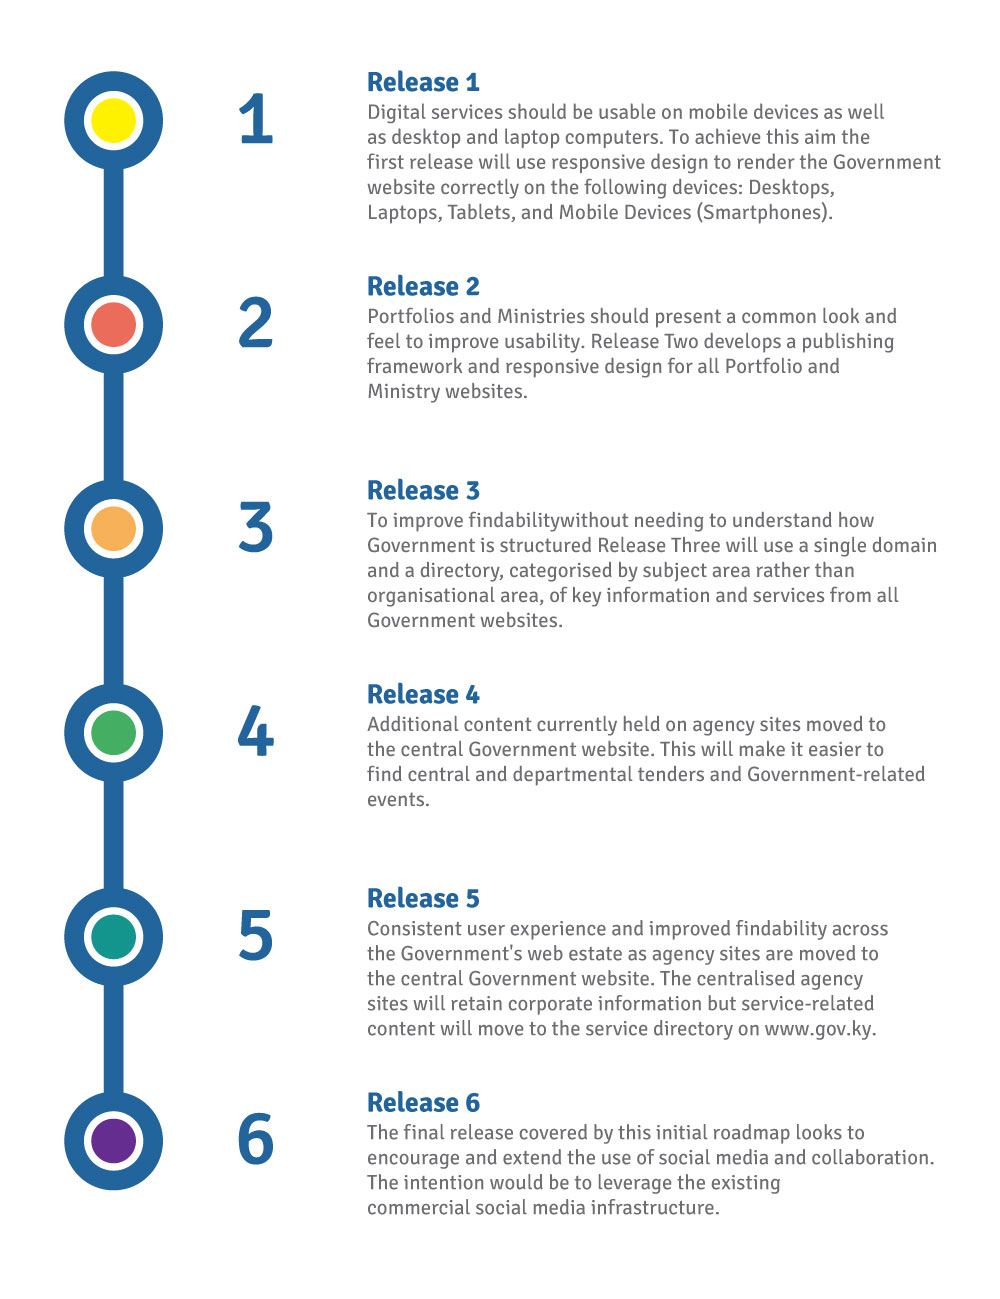
We developed a clear plan on how we would deliver – each step bringing further benefits

Transfer our own departmental website to new framework A no-brainer for this to be the first as we had complete ownership and could make any changes we saw fit. We could use this site as a testbed for our ideas and then have a fully working site showing the new framework to show to people.

Use framework for high profile clients We wanted to find some good influencers within Government. If we could develop the right sites using our framework it would help convince others that this was the way forward. We were able to get agreement from two major entities withing government:-

  • The Office of the Deputy Governor also required a site – we informed them of our plans and sold our new clean design to them. The Deputy Governor was a moderniser, and was also reponsible for the Civil Service.
  • Office of the Premier also required a new site – getting two such significant sites on board early on helped win over a lot of other site owners.

Convert sites with low engagement from site owners A number of the sites we managed were not regularly updated or were in dire need of a revamp. We approached these site owners and suggested that we redeisgned their site in accordance with new framework.

Leverage progress to identify more sites to convert Now we were approaching critical mass with over 20 sites reworked to use the new framework, including the Office of the Deputy Governor and Office of the Premier. Now that clients could see the new framework, and how it was working for a number of different clients, we were able to obtain permission to change some more sites.